
guide
12 Super Fresh and Easy Summer Recipes
Fresh and Easy Summer Recipes
Finally summer! Finally, the weather that we can enjoy outside from morning to night: sun on our skin, wind in our hair – wonderful! On a perfect summer day, of course, you can dine under a blue sky. We have put together delicious summer recipes for light dishes and cooling drinks that you can prepare yourself quickly and with fresh ingredients from the garden. Here we go!
Summer is too short in our part of the world to not enjoy it to the fullest. Anyone who spends the whole day in the garden naturally wants to eat and drink there too. That is why we have put together 12 summer recipes for you – sorted by meals. These are easy to prepare and digestible; summer dishes with and without meat/fish as well as cold and warm can be served. You will also receive recipes for refreshing summer drinks. But the best thing is: at least one ingredient per recipe comes from your garden!
Summer for breakfast
It is well known that tastes are different at breakfast: While some prefer sweet things in the morning, others prefer to start the day on the hearty, hearty taste bar. Our summer breakfast recipes have something delicious for both flavors:
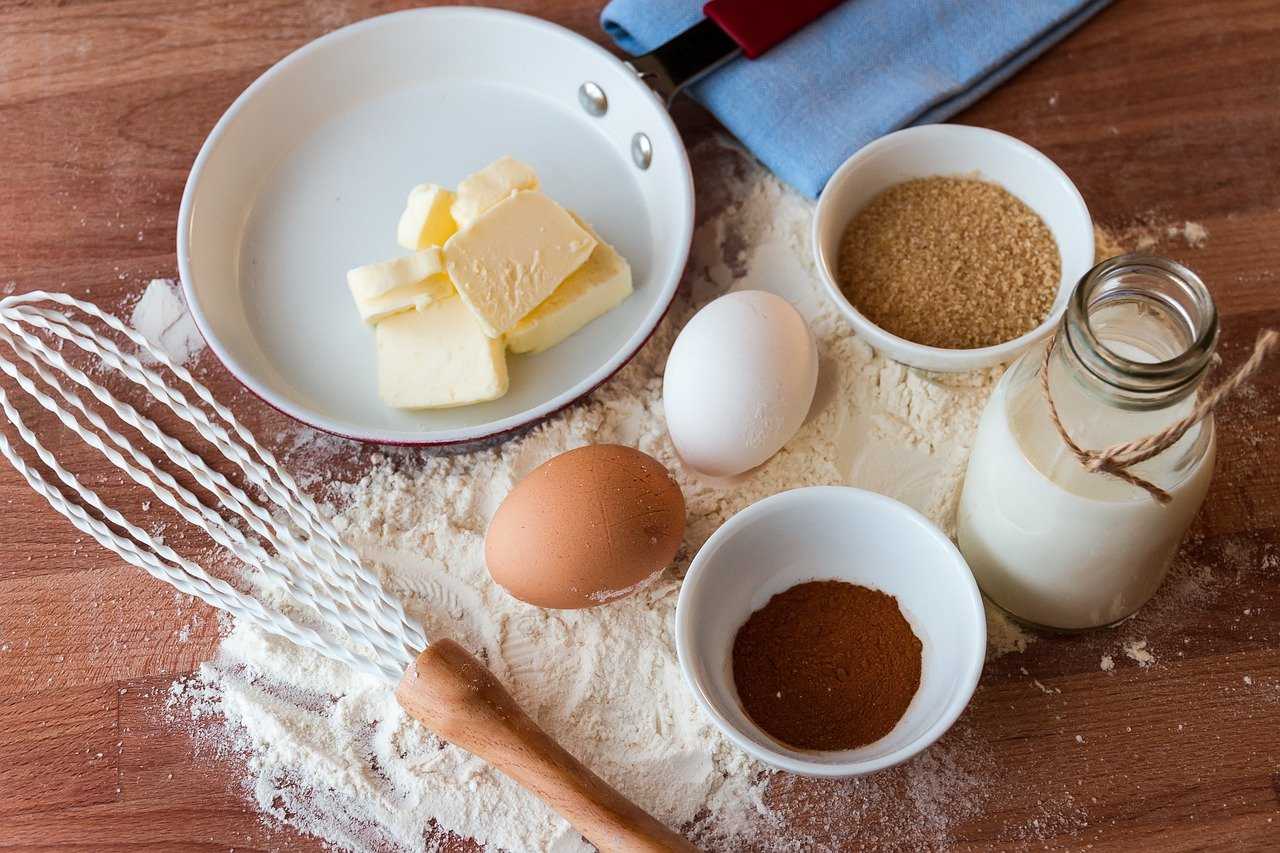
Baked porridge with berries from the garden
For a baking dish of fully baked oatmeal, you need the following ingredients according to the recipe by Christine from the blog Apple of my Eye :
- 2 cups of fresh berries (the recipe also works if you use frozen berries) from the garden, for example, strawberries, raspberries, blueberries, currants (white, red, and black)
- 2 organic eggs
- 3 tablespoons of honey
- 2 cups instant oat flakes (normal oat flakes extend the baking time)
- 1 teaspoon of baking powder
- 1/3 cup brown sugar
- 1 teaspoon of cinnamon
- 1 pinch of salt
- ½ tablespoon vanilla extract
- ¼ cup nuts (pecans or similar)
- 1.5 tablespoons butter or vegetarian alternatives
- 2 cups of low-fat milk or vegetarian alternatives
And this is how the porridge is baked:
- Preheat the oven to 180 degrees Celsius.
- Then mix the dry ingredients: oatmeal; Baking powder, cinnamon and sugar, salt
- Next, mix the milk, eggs, vanilla extract, and butter.
- Layer half of the berries in a flat baking dish. This is followed by the dry mix of ingredients made from oat flakes & Co. Pour the milk mixture over it. The second half of the berries are placed on top and spread the chopped nuts over them.
- The whole thing goes in the oven for 15 to 20 minutes or until the oatmeal has soaked up the liquid. With normal oatmeal, it takes around 35 to 40 minutes.
Our tip: The casserole tastes delicious hot and cold. You can also bake it in the evening and serve it cold in the morning!
Garden herb butter with feta cheese
For the wonderfully fragrant garden herb butter you need the following ingredients according to the recipe by Birgit from the blog EmmaBee :
- 125 grams of soft butter or vegetarian alternatives
- 100 grams of sheep cheese
- 2 spring onions
- 1 clove of garlic
- Herbs of your choice from the garden
- Pepper salt
- Lemon juice
The preparation of the garden herb butter is very simple:
Beat the butter and sheep cheese with the mixer until frothy. Then add onions, garlic and garden herbs – all finely chopped – and stir in. Finally, season the garden herb butter with salt, pepper and lemon juice. It tastes good on hearty dark bread as well as on a warm baguette and you don’t need any additional toppings, guaranteed!
Our tip: If there is any garden herb butter leftover from breakfast, you can serve it for dinner or a barbecue.
Detoxifying ginger-lemon water with cucumber and fresh mint from the garden
A refreshing and detoxifying summer drink is the ginger-lemon water with cucumber and mint according to the recipe from deceptivelydelicious.com. It not only quenches thirst but also stimulates fat burning and thus helps you lose weight. For maximum aroma, it is best to prepare the drink, also known as detox water or infused water, in the evening: cut a medium-sized cucumber from your garden into fine slices. Likewise an organic lemon and a thumb-sized piece of organic ginger root. Put both ingredients in a carafe and pour water over them. A handful of young mint leaves from your herb bed provide a fresh taste. Let the water cool overnight and enjoy it in the morning with its aromatic freshness.
Our tip: drunk three days before each meal, the ginger-lemon water with cucumber and mint more than lives up to its nickname “slim water” as part of a summer diet. Try it!
Summer at noon
Lunch in summer should above all be easy to digest and digestible. We have therefore selected two classic summer recipes for you, one for a crispy, colorful potato salad without mayonnaise that you can enjoy lukewarm or cold, and one for a one-pot pasta with spinach and smoked salmon.
Colorful garden potato salad
For the potato salad according to a recipe from the housewife’s side, you need the following ingredients in addition to two kilograms of waxy potatoes:
- 3 peppers, preferably colorful
- 1 cucumber
- 1 onion
- 2 sour apples
- 5 spring onions
- 1 bunch of radishes
- 3 large tomatoes
- a handful of garden herbs, finely chopped
- some hot vegetable broth
- 2 tablespoons of mustard
- 2 tablespoons of oil
- 1 natural yogurt (150 g) or vegetarian alternatives
- Salt and pepper, possibly garlic
Boil, peel, and slice the first potatoes from your garden. Then stir the vegetable stock with hot water and pour it over the potatoes. Then chop the vegetables and fruit into bite-sized pieces. Mix together the mustard, yogurt and oil and season the mix with pepper and salt. The dressing comes over the potatoes. Then fold in the vegetables.
Our tip: For an “animal” variant of the colorful garden potato salad, you can add smoked salmon, sausages, or garlic salami (in cubes or slices).
Quick one-pot pasta with smoked salmon
For the quick one-pot pasta made to a recipe from Stern you need:
- 1 finely diced onion
- 250 grams of pasta
- 300 milliliters of vegetable broth
- 100 milliliters of cream or vegetarian alternatives
- Parmesan
- 150-gram handful of spinach
- 200 grams of smoked salmon in fine strips
- 1 to two cloves of garlic
- if no children eat: 100 milliliters of white wine
- Salt pepper
The preparation of the one-pot pasta is very quick: peel the onion, cut it in half and finely chop it. Likewise the garlic. Then put the onion, garlic, pasta, vegetable broth, cream, possibly white wine and parmesan in a saucepan. Let the whole thing boil. While doing this, stir regularly. Then let the whole thing simmer for about six minutes with the lid closed on medium heat. Wash the spinach and add it to the pan with the smoked salmon. After simmering for another minute or two, the spinach will have collapsed. Season the one-pot pasta with salt and pepper.
Our tip: The leftovers of this creamy pasta also taste as good cold as a pasta salad!
Refreshing apple iced tea with cinnamon
For the apple iced tea, simply change the recipe for homemade apple and cinnamon tea from Hannah. Instead of serving hot, the tea is served iced, which means that you should prepare it in the evening. Throw two apples cut into pieces, two sticks of organic cinnamon, broken if necessary, and a piece of chopped ginger in a liter of boiling water. Let the brew briefly boil and then steep for a quarter of an hour. Chill the tea overnight and serve it on ice, preferably with a slice of apple in it.
Our tip: You can also freeze the tea as an ice cube and serve it in a glass, where it slowly melts in the summer heat.
Summer for coffee
We think: A pastry with freshly harvested rhubarb should go with the summer coffee in the garden. Because its pleasant acidity combines inimitably with the sweetness of the dough. We will also serve you a recipe for a quick ice cream (without an ice machine) made from the fruits of your garden.
Blackberry ice cream in a lemon (without egg and without ice machine)
What would summer be without delicious ice cream ?! We found a great ice cream recipe on Jenny’s blog Sugar, Cinnamon, and Love that you can prepare without an egg or ice cream machine and serve in lemon peel. The ingredients you need for this are:
- 4 organic lemons
- 375 grams of fresh blackberries from your garden
- Zest of half an organic lemon
- 1 tablespoon of honey
- 1 can (400 grams) of sweetened condensed milk
- 2 tablespoons of melted butter or vegetarian substitute
- 500 grams of whipped cream or vegetarian substitute
And this is how you get a little closer to the (garden) homemade ice cream heaven: Cut the organic lemons in half lengthways, remove the pulp (do not throw away, you can throw it in the iced tea or detox water, for example!). Mix blackberries, lemon zest and honey very finely with the blender or puree. Mix the berry puree with sweetened condensed milk and melted butter. Whip the cream until stiff. Pour the cream into the blackberry mixture. Then fill the finished ice cream into the lemon halves. Leave them in the freezer for at least four hours.
Our tip: If you have more ice than can fit into the hollowed-out lemon halves, put it in a lockable container and also in the freezer compartment. Then you can even refill the empty lemon peel.
Watermelon smoothie with coconut and fresh garden mint
No summer day without a watermelon – that much is certain for us. We deliver the colorful fruit to your coffee as a smoothie, pepped up with mint from your herb garden according to the recipe. In addition to a quarter watermelon, you also need fresh mint leaves and 150 milliliters of coconut drink. The melon must be peeled and pitted. Then put it in the blender with the washed mint and coconut drink. It is served well chilled.
Our tip: If you leave the smoothie mixture in the ice-cream compartment longer, you will get a delicious sorbet.
Summer for dinner
Summer evenings are mild and long. Just right for convivial meals with family and friends. One dish should not be missing: mozzarella with freshly harvested garden tomatoes and homemade basil pesto. This goes well with a slice of black bread with spicy herb butter (see above) or with grilled vegetables. We also serve you a recipe for a quick garden tarte flambée.
Mozzarella with garden tomatoes (on a stick) and homemade basil pesto
For our starter, the photo above provided the idea. All you need is small tomatoes, buffalo mozzarella, olive oil, pepper, salt, basil leaves, and commercially available skewers.
The pesto made from a recipe by Saskia on the blog food likers is what you do:
- Basil leaves (2 pots),
- roasted pine nuts (30 grams),
- Olive oil (80 milliliters),
- Parmesan (50 grams),
- salt
- and a clove of fresh garlic from the garden.
Mix all the ingredients in the blender or with the hand blender until you have a creamy sauce: the basil pesto à la Genovese.
Serve the tomatoes with mozzarella on a skewer with a pile of pesto in between with your garden dinner. You can dust the whole thing with homemade herbal salt and freshly ground pepper and drizzle with a little olive oil.
Our tip: Assorted on a baking sheet, the mozzarella tomato skewers can also be briefly baked in the oven. The delicious aroma is intensified many times over.
Tarte flambée with leek
A tarte flambée is a light summer dish that can be prepared quickly and even on the grill. Our garden tarte flambée based on a Springlane recipe has the following ingredients:
- 1 leek from your garden
- 5 grams of fresh rosemary from your garden
- 1 ready-made tarte flambée batter
- 75 grams of sour cream
- 100 grams of grated mozzarella
- olive oil
- 1 tablespoon butter or vegetarian alternatives
- Salt pepper
Halve the leek stick, wash it, and cut only the white and light green part into fine strips. Pluck the rosemary needles from the stem and finely chop them. In the meantime, the oven can be preheated (20 degrees Celsius top/bottom heat). Then put some olive oil and the butter in a pan and fry the leeks and rosemary for 10 minutes over low heat, until the leeks are soft.
Roll out the tarte flambée batter on a baking sheet lined with parchment paper. Brush it evenly with sour cream and spread the leek on top. Season with salt and pepper. Then the mozzarella is sprinkled over it. The tarte flambée should bake for 15 minutes on the middle rack.
Our tip: For a particularly crispy tarte flambée, you can first bake the dough solo, then top it and bake it again.
Cucumber lasso
As a drink for dinner, we serve you gherkin lassi based on a Severin recipe. For this you need:
- 350 milliliters of natural yogurt
- ½ cucumber from your garden
- 1 teaspoon lemon juice
- some freshly grated ginger
- about 1 pinch of wasabi paste
- 1 pinch of cumin
- 1 pinch of salt
Peel the cucumber and cut it into pieces. It is then pureed with the yogurt and seasoned with lemon juice, ginger, wasabi paste, cumin, and salt.
Our tip: If the lassi is too thick, you can dilute it with cold water or milk.
You have 12 recipes for summer dishes for a summer day in the garden – made from many ingredients you harvest yourself. It remains for us to wish you bon appetit and plenty of suns! Or are you more hungry for a spring-like recipe?
Are you looking for additional inspiration for recipes from the garden? Have a look on our Pinterest board for summer recipes: Hello sun drop by. There we have put together a multitude of great ideas for all things summer.

JUICER
A juicer is a kitchen appliance that extracts juice from fruits and vegetables. There are different types of juicers on the market, so it’s important to know which one is right for you. Some are better for making fresh juice, while others are better for making smoothies. If you’re looking for a new way to add more fruits and vegetables to your diet, a juicer may be just what you need.
When you’re looking for a juicer, there are so many choices to make. How much should you spend? What type of juicer is best for you? In this blog post, we’ll help you narrow down the options and find the perfect juicer for your needs. We’ll talk about the different types of juicers available and what each one can do for you. So whether you’re a beginner or an experienced juicer, read on to learn more!
How Often Do You Plan On Using The Juicer?
As any health enthusiast knows, juicing is a great way to get your daily dose of fruits and vegetables. Not only is it a convenient way to consume more produce, but it also allows you to extract the maximum amount of nutrients from each piece of fruit or vegetable. However, juicing can also be time-consuming and expensive. If you’re only planning on juicing occasional, then it might not be worth the investment. On the other hand, if you’re planning on juicing every day, then commercial juicers could be a great addition to your kitchen. Ultimately, the frequency with which you plan on using the juicer will be the deciding factor in whether or not it’s worth the purchase.
What Type Of Product Will You Be Juicing Most Often?
When it comes to juicing, there are a few things to consider. First, what type of juicer do you need? There are two main types of juicers: centrifugal and masticating. Centrifugal juicers are less expensive and easier to use, but they aren’t as efficient at juicing leafy greens. Masticating juicers are more expensive, but they extract more juice and preserve more nutrients. If you’re planning on juicing mostly fruits and vegetables, a centrifugal juicer will be fine. But if you want to do a lot of leafy green juicing, a masticating juicer is the way to go.
Second, what type of product will you be juicing? If you’re only interested in juicing fruits and vegetables, any type of juicer will work. But if you want to juice wheatgrass or other leafy greens, you’ll need a masticating juicer. Masticating juicers are also better at handling frozen fruits and vegetables. So if you’re looking for a versatile machine that can handle anything from carrots to frozen strawberries, a masticating juicer is the way to go.
How Much Space Do You Have To Store The Juicer?
When it comes to juicers, one of the most important considerations is how much counter space you have available. If you’re short on space, you may want to consider a smaller model that can be stored away when not in use. However, if you have plenty of counter space, you may want to opt for a larger model that can handle more fruits and vegetables at once. Another important consideration is how easy the juicer is to clean. Some models have detachable parts that can be washed in the dishwasher, while others require more manual cleaning. Be sure to choose a juicer that fits your needs in terms of both counter space and cleaning ease.
What Is Your Budget For A Juicer Purchase?
When it comes to juicers, there is a wide range of prices to choose from. Some basic models are quite affordable, while those with more feature-rich juicers can be quite expensive. So, what should you consider when deciding how much to spend on a juicer?
Firstly, think about how often you plan to use the juicer. If you’re only going to make the occasional smoothie or juice, then a basic model will probably suffice. On the other hand, if you’re planning on using your juicer regularly, then it’s worth investing in a higher-quality model that will last longer and produce better results.
Secondly, consider what type of juicer you want. There are many different types of juicers on the market, from centrifugal juicers to masticating juicers. Each type has its own set of advantages and disadvantages, so it’s worth doing some research to find out which type is best suited to your needs.
Lastly, take into account any special features that you might want in a juicer. Some newer models come with built-in food processors or other attachments that can be handy if you plan on doing more than just juicing with your machine. Of course, these extra features will add to the overall cost of the juicer, so only choose them if you feel they are truly necessary.
By taking all of these factors into consideration, you can decide how much to budget for your juicer purchase. Ultimately, the amount you spend should be based on your personal needs and preferences.
Do You Want A Manual Or Electric Juicer Model?
Deciding whether to buy a manual or electric juicer can be a tough decision. If you’re looking for a juicer that is fast and easy to use, an electric model is probably your best bet. However, electric juicers can be more expensive than manual models, and they sometimes require special attachments in order to work properly. If you’re looking for a juicer that is more affordable and easy to store, a manual model is probably the way to go. Manual juicers can be a bit more time-consuming to use than electric models, but they are typically much less expensive. Ultimately, the decision of which type of juicer to buy depends on your personal preferences and budget.
In Conclusion
After considering these five main factors, the juicer that is best for you may become clearer. If you are someone who plans on using a juicer every day and wants to juice a wide variety of fruits and vegetables, then an electric model would be your best bet. However, if you are tight on space or have a smaller budget, then a manual model could be perfect for you. No matter what type of juicer you choose, make sure to read the reviews before purchasing so that you can ensure quality and satisfaction with your purchase!

BBQ
Summertime is all about relaxing, friends and family, and sharing good food and good times. One of the best things about summer is the grilling. There is nothing better than the smell of barbeque meat in the air. However, summer is also a time for sun exposure, which can lead to sunburned skin.
If you want to enjoy barbeque season without the hassle of sunburn and without spending too much time in the sun, read this article to learn how you can set up an indoor BBQ with minimal effort.
What are the benefits of an indoor BBQ?
Whether you live in the city or the country, an indoor barbecue is a great way to enjoy your summer. There are many benefits to having an indoor BBQ. First, it is great for the family to be able to enjoy the summer weather and cook food together. It is also a great way to spend time with friends and family on those hot summer days.
It is also a great way to cook food for parties and events. In addition, it is also a great way to keep your home cool during the summer. Lastly, it is a great way to cook food without a lot of mess.
How to set up an indoor BBQ
Setting up a BBQ is a fun and easy way to enjoy a summer afternoon. There are occasions though whether it is too hot or raining when you cannot enjoy your BBQ outside. This is when an indoor BBQ comes in handy. There are many things you will need to set up a great indoor BBQ, but this article will give you the information and knowledge you need to have a great time.
What is the equipment you will need
In order to set up an indoor barbecue, there are some things that you will need. The first thing you will need is an indoor smokeless grill. An electric grill can provide the great barbecue experience you want without having to tamper with smelly charcoal and messy propane tanks. There are many different models and features so make sure to take time to research before purchasing. Pat’s offers a great guide on what to look for in an indoor grill here. It will allow you to cook easily indoors and some models are versatile enough to be used inside and out.
The second thing you will need is of course some great meat for grilling. You can either buy some marinated or ready made burgers or steak, or you can be a bit adventurous, and try something new. This is the perfect time to try a new recipe that you have been thinking about.
If you are having guests that are vegetarians, you may also want to consider some non-meat courses. One of my favorites to make on the grill is a vegan quesadilla, you can get the recipe from this site. It is easy to make and tastes great.
For any successful barbecue you will also need some great side dishes. Whether your main course is chicken, turkey, or other meat you will want to have a wide selection of great side dishes. Many vegetables you can cook on your indoor grill . The best advice for these side dishes is to always stick with the classic.
Lastly, you will need a great beverage and wine to set the mood. Be sure to have a few different wines on your table so that you can sample a wide variety of wines. This will keep your guests happy and guessing what the next wine is going to taste like.

BBQ
How long does it take to set up an indoor BBQ?
If you are in a hurry, and want to get your indoor BBQ up and running as soon as possible it will not take too long. If you already have grill tools on hand, then you can be grilling in no time at all.
A smokeless grill will usually come up to temperature within a few minutes of turning it on. This will vary by the model you have, but typically the temperature will reach 350 degrees in no more than 30 minutes. As an example, my Ninja Foodie grill takes approximately 10 minutes to reach 350 degrees.
Once your smokeless grill is up to temperature you can begin preheating your bbq cooker and start grilling on it as well. Once you are ready to eat you simply remove the meat from the grill and apply BBQ sauce or ketchup.
How to maintain an Electric BBQ Grill
Most indoor grills offer a non-stick surface so cleanup is usually a breeze. There are a few things that you will want to be careful about.
One thing to keep in mind is that some indoor grills may not handle the heat as well as an outdoor grill does. If you are attempting to cook a large steak, for instance, it would be best to cook it outdoors and then transfer it into the indoor grill for serving. Always use your indoor BBQ grill with care so that you do not ruin the non-stick surface or cause damage to the unit itself.
Are There Any Other Benefits to Using An Indoor Grill?
Grilling indoors during the summer is a great way to enjoy your BBQ without a lot of hassle. There are many other benefits to using an indoor grill.
Not only can you enjoy your food without the sun, but you can also avoid some of the bugs that come out at night. If you want to impress your guests with great grilled food, an indoor grille may be the perfect solution for you.
An indoor grill can also be healthier as many have features to drain and remove grease from the meat. This is a great feature for those who want to avoid consuming a lot of fats and oils. In addition, indoor grills do not generate a lot of smoke, so you will not have to worry about breathing in all that toxic smoke coming from an outdoor grill.
Conclusion
In conclusion, an indoor barbecue is a fantastic way to enjoy your summer. You get the great taste of barbecue without worrying about sunburn or sticking to your grill. It is also a great way to cook inside on those rainy or hot days that do not make grilling outside an option.
If you follow the tips in this article, and have all the right equipment, you will have a great time setting up your indoor grill and cooking some of your favorite meats at home.

Barbeque
Before you break out the grill and start cooking up some barbecue for tonight’s game, be sure to check out our Beginners Guide to Getting Started in Barbeque. Learn everything from the first step of what type of equipment is needed to tips on grilling anything off your grill. Give your family and friends a taste of some of the great barbecue from around the world today without breaking your wallet.
Below you can find our Beginners Guide to Getting Started in Barbeque.
What You’ll Need
Depending on your personal preferences, there are a wide variety of grill styles to choose from. No matter what grill you choose, you will need the following supplies:
Barbeque Grill
You will need a grill to put the coals on, of course. The average price of a basic bbq grill is $100.00 and can go up to several thousand dollars for smokers that are used for competition purposes. There are a wide variety of grill styles to choose from. The most popular include:
- Charcoal Barbeque Grills
- Propane Gas Barbeque Grills
- Electric Barbeque Grills
- Smokers
No matter which style of grill you choose, make sure the grill you get is big enough for what you plan on cooking. This will vary between the different types of grills since some cooking method require more space than others do. You can learn more about grills on a variety of grilling and smoking specific sites like Pat’s Bar and Grill. The most common is the charcoal bbq grill which takes up about 180 square inches and the propane gas bbq grill which takes up about 250 square inches.
In addition to a grill you will need other supplies such as the following:
- Fuel (Propane Tank, Charcoal or Wood)
- BBQ Rubs & Marinades
- Starter (for Charcoal Grills)
- Grill brushes (for Charcoal Grills)
- Grill gloves
- Quality Cuts of Meat
Grilling Basics
To get start grilling, you will want to warm-up the grill to get it ready to use. Here’s how for a charcoal grill:
1. Fill all the burners with one-third of a tank of liquid charcoal (also referred to as briquettes) or wood chunks, whichever you prefer. This amount is enough for about four hours of cooking time on average, so start low if you don’t have a large grill. You may need more if your fire is smaller or spread across many coals.
2. Light the coals or wood chunks with a lighter, then cover the grill and let it sit for about 10 minutes.
3. Uncover the grill, adjust all the burners to medium heat and allow 30 minutes to an hour for the grill to heat up fully.
4. Half-fill a spray bottle with water and lightly mist your food (especially any of your spicier cooked items) as you place it on the grill to keep them moist while they cook and to help them brown better.
5. After about three-quarters of the cook time is over, spray your food again with water. This will help it stay moist while cooking and give it a nice glaze as it cooks.
6. If you need to add more coals or wood chunks, do so about halfway through your cook time. If you leave them on the grill for too long, they will burn, or smolder and smoke a lot rather than actually producing heat.
Tips and Tricks for Grilling
Below we have prepared some great BBQ tips and tricks to help get you started.
Prepare your grill the night before or first thing in the morning and let it sit for a few hours. This will allow the coals to get hot and the grill to heat up so you get a good cook. If you just light your bbq up an right before dinner, there’s a good chance you won’t have enough heat to really cook well.
Make sure you know how to choose a great cut of meat. This can make a big difference in the taste of your meal. For example, if you use a less flavorful cut or a poor quality, it will lack flavor. In addition, there are different cuts of meat that work better for smoking vs grilling.
Make sure to allow the entire amount of time you set aside for the bbq to cook. It might take longer if the weather isn’t right or if you cut up an already tough part of meat and haven’t allowed enough time for it to cook all the way through.
Foil will work well to keep your food moist while on the grill and avoid flare ups, but it doesn’t do a great job keeping things warm. Try not to take too much food out of the oven or you run into problems with the food drying out, getting cold and losing flavor in the process.
If you have a very high heat bbq grill, use reflective foil to keep the heat in. This will also help you avoid flare-ups and help you cook things quickly.
When grilling, use a thermometer to make sure your food cooks properly. For example, if you are cooking a burger medium rare, it should be cooked to about 140F.
Many people make the mistake of trying to grill sweet things like chicken at too high a heat. This can give them a burnt taste, or make them dry or tough if they are pre-cooked or thrown on at too high of a temperature.
You will want to watch your food closely while cooking it so you don’t overcook any of the pieces, especially vegetables. You don’t want them to overcook and become bland or burnt.
If you want to make great barbecue, you need a good supply of wood chunks. They add the smoke flavor and the heat so it will make a better tasting meat, or vegetables anyway. When making a batch of chicken, you will want to use about 2-3 pounds of wood per two pounds of chicken.
Conclusion
Now you’re ready to start grilling, just remember these basic steps and get your grill fired up. Practice is important when it comes to grilling, so experiment with different cuts of meat and styles of cooking. Try some new flavors while you are at it! It’s also a good idea to write down all your recipes in order for you to have them ready next time you fire up the grill.
Well, that’s about it on how to get ready to cook barbecue. We hope you have a great time grilling and cooking some delicious food!

 Organic3 years ago
EatMyBananas.com Shares A Shocking Ingredient In One Of Their Local Dishes

 Food4 years ago
Food Web Creator (Maker)

 Education2 years ago
What is an Induction Oven & How Does it Work?
- Germany-De3 years ago
Kürbissuppe – Rezept Cremig Geröstete

 Fruits3 years ago
Top 10 Fruits for Weight Loss
 Organic3 years ago
What is a healthy diet?

 Food3 years ago
Mango Juice

 Food3 years ago
How to make Smoothies Shakes?